This guide helps you model a Pokemon app 😛 to explore the data modelling in Space Cloud!
Note: This guide assumes PostgreSQL as the database, but you can use whichever you like.
If you want to follow this guide along practically, first deploy Space Cloud along with PostgreSQL and create a project in Mission Control with PostgreSQL as the primary database.
Then head over to the Overview tab in the Database section.
Time for some data modelling now!
The Pokemon app which we are going to build have trainers and pokemons (quite obvious😅).
Each pokemon belongs to a single trainer, and each trainer can have multiple pokemons😋. Note that this a one-to-many relationship. Read more about modelling relations here.
We want each trainer to have a unique id, name and city field.
Click the Add table button in the Database Overview page in Mission Control to open the following form:
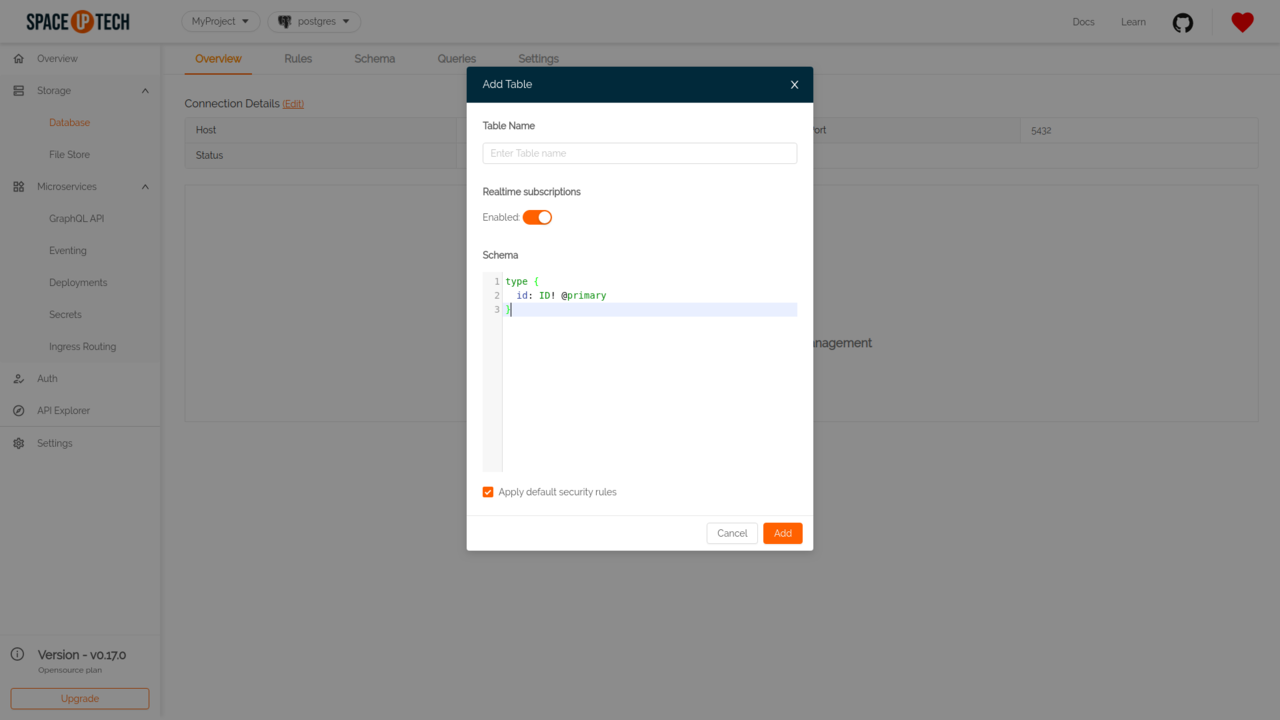
Name your table as trainer.
Copy-paste the following schema and hit Save:
type trainer {
  id: ID! @primary
  name: String!
  city: String
  pokemons: [pokemon] @link(table: "pokemon", from: "id", to: "trainer_id")
}
Space Cloud creates a trainer table with the above schema. The exclamation mark ! for id and name indicates that these fields are required (i.e. they can’t be null).
Note: The
pokemonsfield is not a physical field in thetrainertable. It’s just a virtual field that links to thepokemontable to make GraphQL queries and mutations simpler from the frontend. We are going to cover it in more details below.
Let’s say a trainer wants to record the name and combat power of each pokemon along with the date when he captured it.
Once again click on the Add table button to add the pokemon table with the following schema:
type pokemon {
  id: ID! @primary
  name: String!
  combat_power: Integer
  caught_on: DateTime! @createdAt
  trainer_id: ID! @foreign(table: "trainer", field: "id")
}
The @foreign directive above instructs Space Cloud to create a foreign key on the id field of the trainer table. This foreign key prevents any actions that would destroy the links between the pokemon and trainer table. Which means that the database would throw an error if you delete a trainer before deleting their pokemons.
You can modify the foreign key behaviour to delete the child record(s) automatically when parent record is deleted instead of throwing error. This can be done by specifying the
onDeleteargument of theforeigndirective as follows:
type pokemon {
  id: ID! @primary
  name: String!
  combat_power: Integer
  caught_on: DateTime! @createdAt
  trainer_id: ID! @foreign(table: "trainer", field: "id", onDelete: "cascade")
}
The @createdAt directive helps Space Cloud to automatically insert the datetime value whenever you insert a pokemon into the pokemon table.
Let’s insert some data and see whether Space Cloud is validating our data and maintaining its integrity or not.
Head over to the Explorer section in Mission Control:
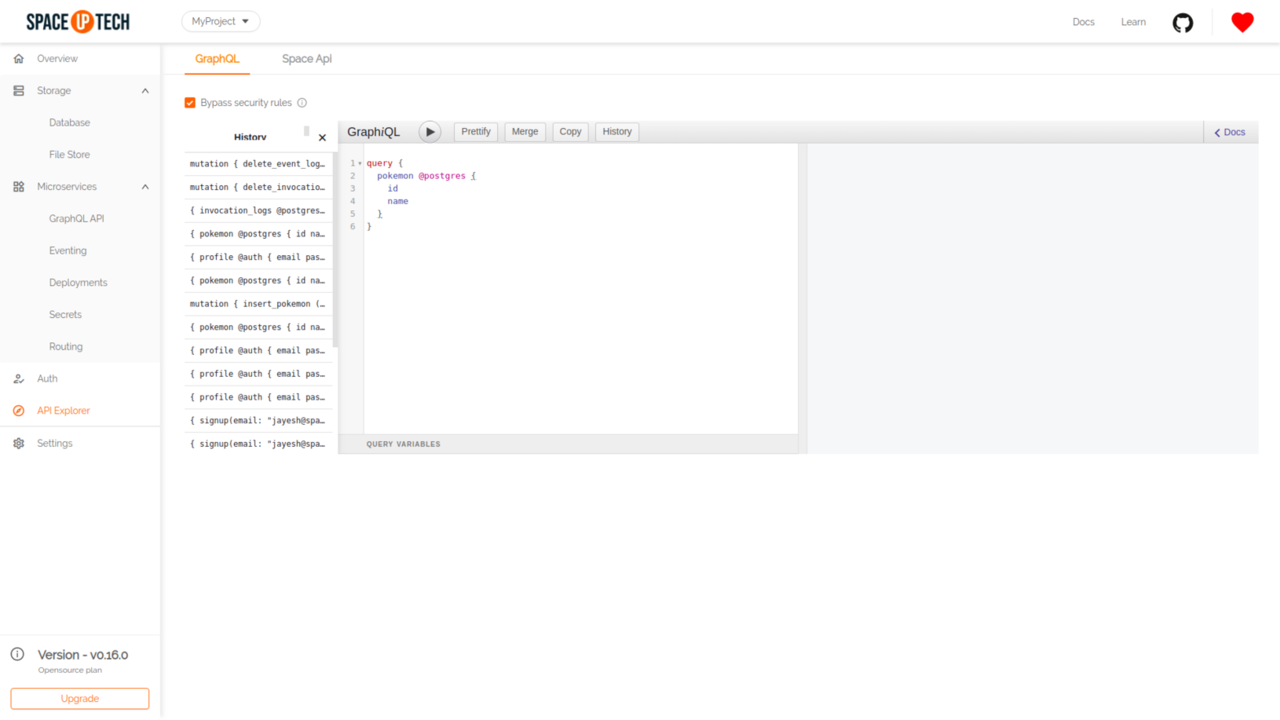
Try running the following graphql queries to insert some trainers and pokemons:
mutation {
  insert_trainer(
    docs: [
      {
        id: "ash",
        name: "Ash",
        city: "Pallete Town",
        pokemons: [
          {
            id: "1",
            name: "Pikachu",
            combat_power: 200
          },
          {
            id: "2",
            name: "Charmender",
            combat_power: 150
          }
        ]
      },
      {
        id: "misty",
        name: "Misty",
        city: "Cerulean City",
        pokemons: [
          {
            id: "3",
            name: "Psyduck",
            combat_power: 180
          },
          {
            id: "4",
            name: "Goldeen",
            combat_power: 150
          }
        ]
      }
    ]
  ) @postgres {
    status
    error
  }
}
You would see a response like this:
{
  "insert_trainer": {
    "status": 200
  }
}
This means we have successfully inserted trainers along with their pokemons.
Space Cloud inserts the trainers info in the trainer table while the nested pokemons info in the pokemon table.
If you remember, we mentioned a @link directive on the pokemons field in the trainer table along with the argument - table: "pokemon". Space Cloud uses this information to insert the pokemons array correctly into the pokemon table. It also inserts the pokemon.trainer_id field automatically based on the foreign key that we mentioned.
Try running the following graphql query in the GraphiQL section:
query {
  trainer @postgres {
    id
    name
    city
    pokemons {
      name
      combat_power
      caught_on
    }
  }
}
You should be able to see a response which looks like this:
{
  "trainer": [
    {
      "id": "ash",
      "name": "Ash",
      "city": "Pallete Town",
      "pokemons": [
        {
          "name": "Pikachu",
          "combat_power": 200,
          "caught_on": "2019-10-15T07:21:14.643874Z"
        },
        {
          "name": "Charmender",
          "combat_power": 150,
          "caught_on": "2019-10-15T07:21:14.643876Z"
        }
      ]
    },
    {
      "id": "misty",
      "name": "Misty",
      "city": "Cerulean City",
      "pokemons": [
        {
          "name": "Psyduck",
          "combat_power": 180,
          "caught_on": "2019-10-15T07:21:14.643877Z"
        },
        {
          "name": "Goldeen",
          "combat_power": 150,
          "caught_on": "2019-10-15T07:21:14.643877Z"
        }
      ]
    }
  ]
}
The query that we used above performs a join operation on the backend between trainer and pokemon table with the condition - trainer.id == pokemon.trainer_id. This condition is derived by the arguments (table, from, to) of the @link directive, which we mentioned earlier. You can read more about @link directive from here.
Notice that we even received the values for caught_on even though we did not specify it while inserting. It means that Space Cloud auto-generated the values for caught_on field for us! Pretty great right?
It’s time to put on the devil’s hat and tinker around Space Cloud’s data validation plane!
Let’s check whether Space Cloud is enforcing the constraints or not that we specified (Foreign keys and required fields in our case).
Try running the following query in the GraphiQL section:
mutation {
  insert_trainer(
    docs: [
      {id: "brock", city: "Pallete Town"},
    ]
  ) @postgres {
    status
  }
}
This query should return the following error - Field name Not Present.
Let’s check whether the field type validations are working or not. Try running the following query in the GraphiQL section:
mutation {
  insert_trainer(
    docs: [
      {id: "brock", name: 123, city: "Pallete Town"},
    ]
  ) @postgres {
    status
  }
}
This query should return the following error - Integer wrong type wanted String got Integer.
Note: This validation layer works even for schemaless databases!
This robust validation layer ensures that no one can mess around with your data structure! 😎
Now let’s check whether the foreign keys are working or not:
mutation {
  delete_trainer(
    where: {id: "ash"}
  ) @postgres {
    status
    error
  }
}
This mutation should fail with the following response:
{
  "delete_trainer": {
    "error": "pq: update or delete on table \"trainer\" violates foreign key constraint \"c_pokemon_trainer_id\" on table \"pokemon\"",
    "status": 500
  }
}
It means Space Cloud has created foreign keys for us which helped us maintain the integrity of the relation.
Great! You have just learned the basics of data modelling in Space Cloud. The next steps would be to take a deep dive into all the features of data modelling or learn modelling relations in detail.
Have a technical question?


Improve the docs!
